You know how to design gorgeous paper products…but do you know how to photograph them?
As a professional photographer, I have all the lighting equipment I could ever want to make a product shine. However, the vast majority of people don’t have access to this array of lighting, let alone photography lights. Buying these things can be very expensive, and may not seem worth it when it comes to your bottom line.
Luckily, you don’t need a fancy light setup to capture a beautiful shot! Window lighting is totally doable for the novice photographer, but you may have to Google a few things in this post depending on your experience level.
Window light is readily available and free (you can’t beat that price!). The light coming through your window will change throughout the day depending on the sun’s angle and cloud cover. Pick a time of day when the light is soft, meaning the sun’s rays are not beaming directly through the window. The variations of light will affect the overall look of your photo, so I highly suggest experimenting!
Different specialty print processes require different photography techniques, so we’ll start with the simplest to photograph: digital. The most common and contemporary way to shoot invitation suites is laying flat with minimal or no props, so that is the setup I chose for this post. While I’m sure most readers have a good idea of what I’m talking about here, a quick web search will generate a wealth of examples to start from.
Step 1. Gather supplies:
• Camera (DSLR highly recommended)
• Tripod
• Level
• White foam core
• Small ladder
• Background and props
Step 2: Scope out your shooting location.
The ideal window light is in a room with one large window and no other windows. If you can only use a room with multiple windows, make sure to cover up light coming in from other windows as much as possible (I recommend a blackout curtain). Also make sure no artificial lighting is on, in or near your setup. Having one light source will give the most control in this situation.
Step 3: Choose/prep the shooting surface.
I like to use a sturdy table with a height that’s more or less even to the bottom of the window. A higher table will also make it easier on your back when you’re adjusting and making changes.
Step 4: Choose props that accent your product.
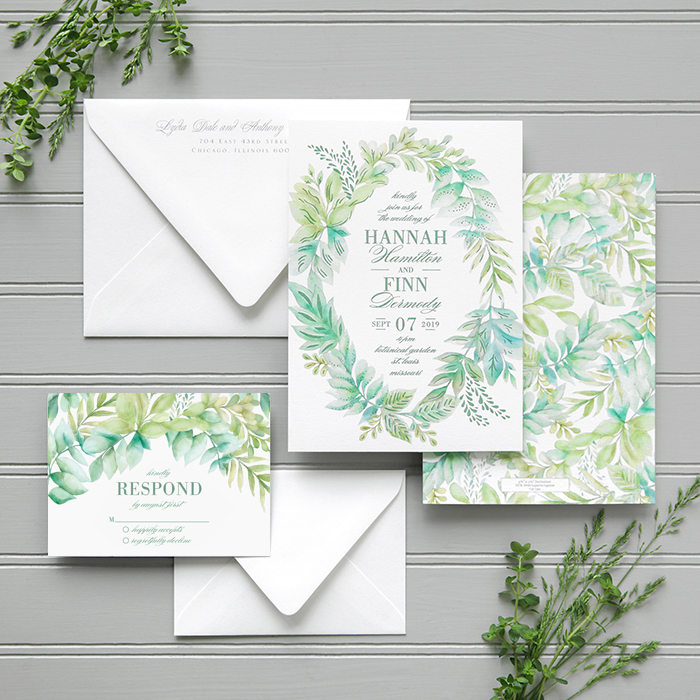
You can often find what you need within things you already own. Sometimes, a trip to the store for a few fresh flowers or a twirl of ribbon is necessary to get your desired look. Also decide what to place under your product as a background, which will need to coordinate with the props and product. Well-ironed household linens can look great, as well as a piece of seamless paper. Keep it simple so your products remain the focus of the image. I used a small, painted piece of bead board and some greens from my garden.
Step 5: Compose your shot.
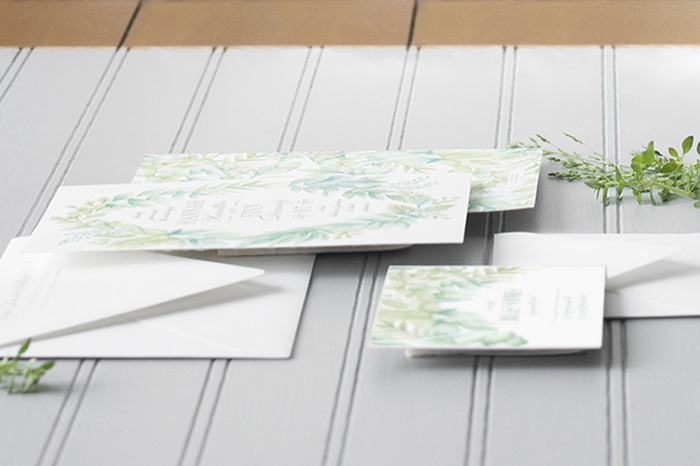
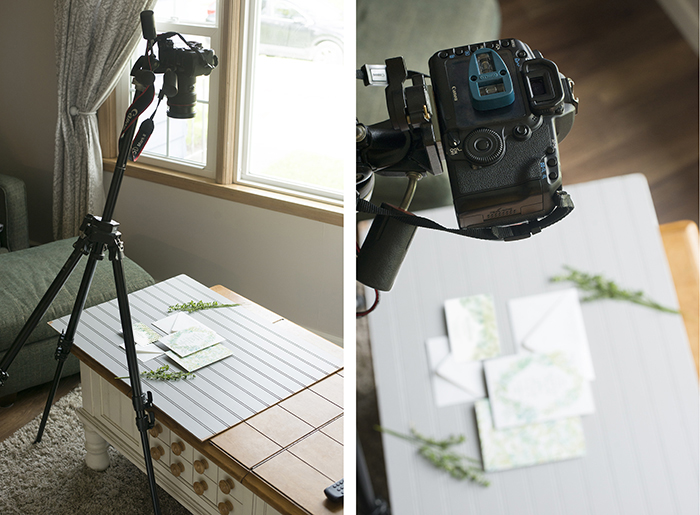
When arranging everything, keep your crop size in mind. You want to fit everything in without too much blank space. Also think about the direction of light, and where you would like your shadows to fall. You can rotate your arrangement to see what looks best because, unlike professional strobe lighting, what you see is what you get. I like to cut up small pieces of foam core and/or cardboard, and place them under each item to give a bit more shadow and dimension to the shot (see comparison image up top).
Step 6: Choose your angle.
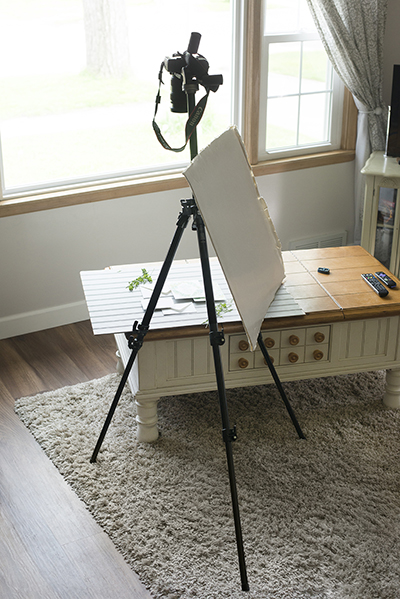
If you’re shooting overhead, which is the most common way, it’s best to use a tripod. Use a level to make sure your camera is parallel to your product. This will ensure little or no image distortion. If you’re using a standard tripod with no attachments, like I did, the camera can make it very top-heavy and prone to tipping. I just leaned it against my table, and the fluffy rug gave it enough grip to be stable. Any sort of weight on the longest leg can help keep your tripod in place, too.
Step 7: Take the shot!
Since your tripod will likely be a little shaky, it’s a good idea to use the timer mode. This will help you avoid a blurry shot, because your tripod will have some time to be still again after you hit the shutter button. You may also need a small ladder, depending on the height of your table, so you can look in the viewfinder and see the viewing screen.
Step 8: Check your shots.
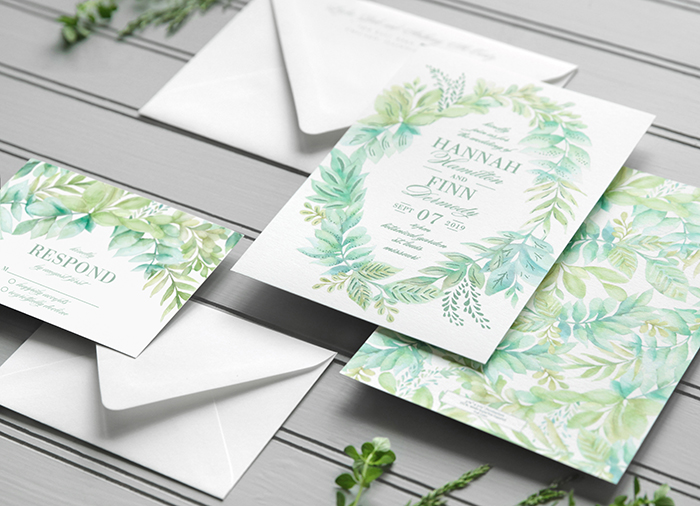
Take as many shots as you need, and be sure to check them out on your computer screen before tearing down your set. Below you can see my final results! My settings were f/5, 1/60s, ISO 320, Focal Length 44mm.
5 Tips to Get the Best Shot
1. Avoid using a wide-angle lens, as this will distort your products.
2. I don’t suggest using cell phone cameras for a few reasons: they often have a wide-angle lens and sub-par resolution. Lastly, they have a poor dynamic range, which means it’s easy for your lights to get too light and darks to get too dark.
3. Use the manual settings on your camera if you know how. This gives the best exposure control. If you’re not familiar with f-stops, shutter speeds and the like, there are plenty of online tutorials (check out one of my favorites here) to get you started! If not, using auto mode will likely be fine.
4. Play around with your white balance to find the setting that looks most like what you see with the naked eye. Just make sure to shoot in RAW format, whatever route you choose, so you will have plenty of flexibility for editing.
5. Get a little more light control by using a piece of foam core to reflect the window light back onto your shot. This will make your shadows a little less drastic. You can hold the foam core while you shoot, and play around with the angle and distance from product. I just leaned it on my tripod since I had to take the photo of this setup!
And here’s a comparison to show you the difference between using the foam core and not using it:

Leave a Reply