Hey all! When I created the Mardi Gras Party Invitation for our Mardi Gras INKSPIRATION Board back in February, I was excited to create custom party invitations that were a little on the wild and crazy side. I mean, that’s why Mardi Gras is so much fun, right? One day out of the year, we get to celebrate overindulgence!
For me, though, the design is only one piece in a long equation of custom print variables. My job is to follow a printed piece through the whole process and analyze the many steps along the way all while asking myself a long list of questions. The purpose of my efforts is to help better the process so we can print something wonderful for all of you. Sound challenging? It is, and I like it.
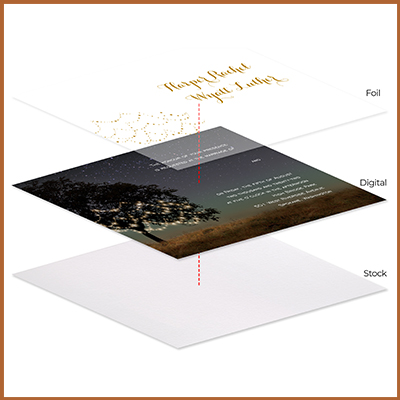
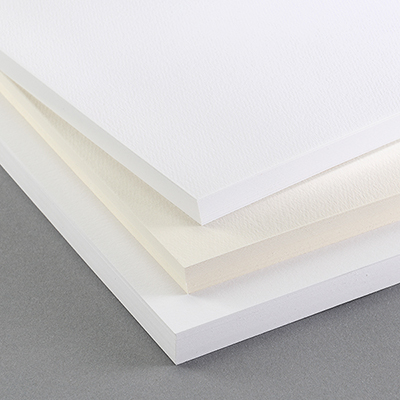
I wanted to give you a quick look at some behind-the-scenes aspects of custom printing using the custom print Mardi Gras invitations. The first thing I wanted to do with this sample is test out a few different papers. I chose to design this piece using the digital + foil pairing on 5 x 7 flat cards. The digital print run always comes first and so you can see here, with our 4-up sheets, the difference in paper with three of our more popular paper choices.


The cotton paper has the most texture and because of its soft, thick nature it absorbs more ink which lightens the colors a bit. The semi-gloss paper keeps the color rich and vibrant while our standard paper falls right in between the two. There’s a reason it’s our standard — it’s always a great choice!

Now it’s time for the 4-up sheets to be cut down and stamped with real gold foil. The die we use is made of magnesium, and this simple metal die works beautifully to transfer your custom print stationery designs onto your choice of top-quality TOG.ink papers. Just look at the dimension and detail of this die; it’s easy to see why real foil stamping is so stunning. We’ll talk more about dies in the future because we actually use three different types of dies here at TOG.ink for three different printing methods. The reasoning behind each is pretty interesting to stationery nerds like you and me!

You can see how fine some of the foil artwork lines are and how well the registration lines up. We provide artwork specifications in our collection of Cheat Sheets, which are super helpful but I always like to tell our designers to test things out! Since we have such a low minimum quantity, you can easily test different fonts and point sizes to find the limits of what we can do with your artwork while keeping clean and accurate registration. Foil printing is not an exact science so running your own experiments will help you create the best custom print stationery possible.

Finally! You can see the finished product, and I have to admit I think the digital + foil pairing does a really nice job of capturing the essence of Mardi Gras. Laissez les bons temps rouler!
April 14, 2021
Author : Eric
Title: Art DirectorYears at The Occasions Group: 16 years
Favorite Print Process: Laser cutting (But that's only because letterpress has gotten most of the love since Gutenberg hit the scene)
Secretly I’m really good at…pointless random facts. I kill it at bar trivia!